Last Updated on September 30, 2026 by David
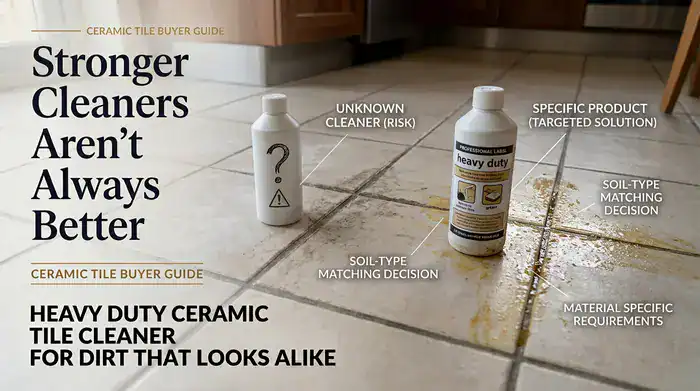
A ceramic tile floor that is heavily soiled requires a cleaner that specifically matches the type of dirt present. Using an inappropriate product can lead to unsightly darkening of grout, increase the visibility of residue, or even damage the tile’s permanent finish. While cement-based film, kitchen grease, tracked dirt, and stained grout may appear similar at first glance, each requires a distinct approach when selecting a cleaning solution.
Selecting an Affordable Heavy-Duty Cleaner That Keeps Your Tiles Safe
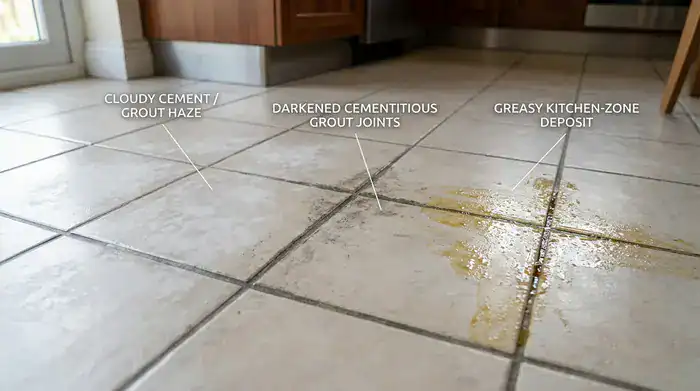
If your ceramic tiles display a cloudy cement-based film, discoloured grout, or greasy patches from the kitchen, evaluate each area under consistent lighting before opting for a heavy-duty cleaner. Although the floor may seem uniformly dirty, the condition of the tile surface, grout joints, and food preparation areas can vary significantly.
A cloudy film on otherwise clean tiles typically indicates cement-based installation residue. This residue may dry with a matte, pale, or streaky finish, particularly on the large-format rectified porcelain frequently used in contemporary kitchens and bathrooms across the UK. Newly laid floors can also retain stubborn polymer-modified grout haze that standard maintenance cleaners cannot eliminate, necessitating the use of an appropriate grout haze remover.
Dark or uneven grout joints often signal an issue with the grout itself rather than any staining absorbed by the ceramic tiles. Discoloured grout can make an entire floor appear neglected, especially in areas where patterned tiles have narrow joints or where foot traffic has consistently trampled soil.
Kitchen grease presents a different challenge. A darker band may form near the cooker, splashback, or worktop, while adjacent tiles remain relatively clean. This accumulation often manifests as a dull film that reappears shortly after using a damp cloth or general floor cleaner, rather than being effectively removed.
Textured and anti-slip finishes complicate matters further. Riven surfaces, embossed patterns, and tiles designed for wet rooms can trap visible dirt in their recesses, while smooth, glossy tiles tend to display streaks and drying marks more prominently. The comparison must take into account the tile finish, grout coverage, room usage, and the age of the contamination, rather than relying on labels like industrial or maximum strength.
Choosing a cost-effective option means avoiding both unnecessarily harsh products and those that are too gentle. Determine whether the primary issue is cement residue, discoloured joints, greasy deposits, or a textured surface before comparing concentration, intended use, and compatibility statements.
Readers interested in a broader understanding of ceramic and porcelain behaviour can explore the ceramic and porcelain floor care hub to view visible issues in relation to the entire installation. This comprehensive perspective helps prevent misinterpreting a grout-led appearance as a failing tile surface.
How Using an Incorrect Cleaner Can Instantly Harm the Tile Finish
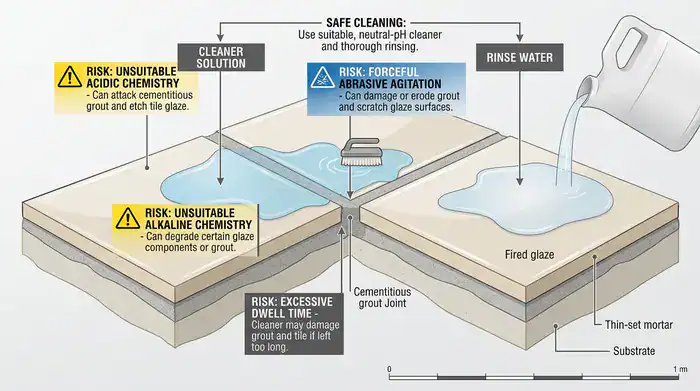
A factory-fired glaze can appear intact while unsuitable chemical interactions, prolonged contact, or aggressive agitation can damage the surrounding grout. It is advisable to test a small area first, then examine both the tile surface and the joints. Glazed ceramic features a hard, vitreous, and non-porous exterior, whereas cement-based joints are more vulnerable to changes in colour, residue retention, and chemical degradation.
A high-alkaline cleaner is effective for organic soil because its alkaline pH, surfactants, and degreasing properties can emulsify cooking oils, traffic grime, biological contaminants, and mould-related dirt. its strength must be managed. Excessive dwell time, concentrated application, or inadequate rinsing can leave alkaline residue around porous joints, leading to the formation of a new surface film.
Conversely, an acidic cleaner is designed for mineral deposits, not grease. Acidic pH facilitates the dissolution of minerals where grout haze, calcium deposits, hard-water films, or limescale treatments require targeted intervention. Yet, repeated exposure to acid can weaken the colour and texture of grout. Acid alone may also struggle with polymer bonding found in modern installation residues, necessitating a different evaluation.
The chosen product must align with the specific type of deposit, not merely be the strongest option available.
Product instructions should specify the intended soil type, compatible tile finish, dilution ratios, dwell times, and rinsing requirements. When product claims fail to distinguish between organic soil and mineral residue, consumers may refer to the ceramic tile cleaner comparison guide for additional guidance.
Professional assessment offers greater utility where multiple deposits coexist. For instance, an alkaline first stage may be effective for grease, while a subsequently selected acidic treatment can tackle mineral film. The assessment should also consider surrounding materials, coloured grout, hard water, and any existing coatings prior to choosing a cleaner.
Which Cleaning Risks Are Acceptable—and Which Should Be Avoided
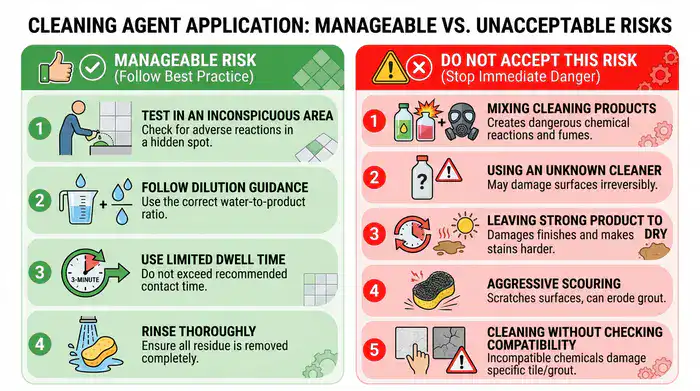
Opting for the strongest cleaner without assessing the surface can lead to unnecessary problems, particularly where textured grooves and grout joints trap residue that impacts appearance and safety underfoot. A manageable risk involves testing a compatible product in an inconspicuous area and evaluating the results after drying rather than judging solely by the wet appearance.
Manageable risk refers to ensuring the test area retains its colour, sheen, and texture after the specified contact time and thorough removal. Textured ceramics require careful scrutiny since grooves can trap dirt, foam, and rinse residue. A product that loosens dirt yet leaves a tacky film has not resolved the underlying issue.
A warning sign is any small-area test resulting in altered tile appearance, lightened grout, white deposits, or a loss of confidence in the floor’s anti-slip properties. R11 wet-room surfaces depend on surface grip, and residue accumulation can diminish practical performance even if the tile remains structurally intact.
Heavily soiled grout joints also require caution, as repeated aggressive scrubbing can exacerbate the visible contrast between clean tiles and damaged grout. Readers who remain uncertain can compare symptoms with common causes of dull-looking ceramic floors before selecting another product.
Seeking professional advice becomes the safer option if testing yields streaking, persistent residue, altered colours, or doubts about slip performance. A cleaner cannot remedy cracked joints, missing grout, damaged glaze, or installation movement, so recognising these signs should halt any further product escalation.
What Soil and Surface Conditions Demand from a Cleaner
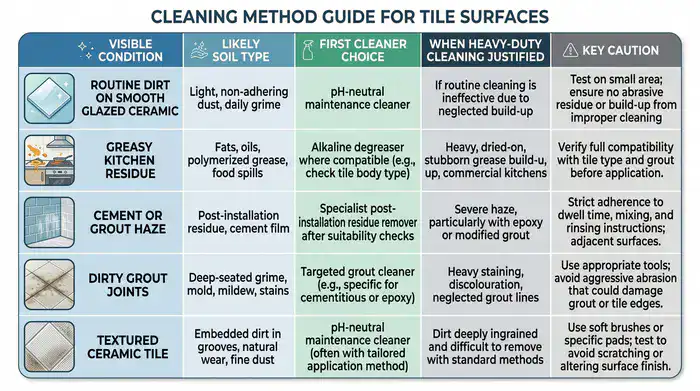
Typical soil on a well-maintained, smooth ceramic installation generally responds best to a pH-neutral tile cleaner instead of a heavy-duty concentrate. A balanced pH, gentle surfactants, and a residue-free formulation facilitate routine cleaning without the risk of etching or progressive damage to grout protection.
The visible deposit should inform the next category selection. Grease and biological contamination indicate a need for controlled alkaline degreasing. In contrast, mineral films necessitate carefully specified acidic formulations. post-installation clouding may require specialised treatment, as polymer residue behaves differently from loose dust.
- Determine if the deposit is greasy, mineral, cement-based, biological, or typical traffic soil.
- Examine the tile finish, grout colour, joint condition, and any coatings or waxes prior to comparing products.
- For routine soil, use a mild pH-balanced option, reserving specialist products for when the deposit specifically demands it.
- Cease the selection process and seek professional assessment if the surface changes, residue persists, or physical damage is evident.
Unglazed ceramic requires a distinct level of care due to its porous nature, which can absorb contaminants and may necessitate sealing decisions that do not apply to glazed tiles. A matte finish does not automatically indicate that a tile is unglazed, especially with contemporary ceramic and porcelain-effect finishes available today.
Professional deep cleaning is warranted when soil is embedded within textured recesses or porous joints, and ordinary products consistently fail to remove traffic film. A safe ceramic tile deep-cleaning method should encompass mechanical agitation, extraction, and surface protection without implying that a single chemical is suitable for every floor.
How to Effectively Compare Cleaner Options for Your Tiles

A thorough cleaner comparison begins with examining the tile in front of you. Assess the finish, grout condition, and type of soil before measuring one product against another. Product instructions should clearly state the compatible materials, dilution ratios, dwell times, rinsing, and testing requirements; vague claims about maximum strength provide little assurance of suitability.
Options that disregard textured or anti-slip surfaces, coloured grout, hard-water residue, or previous coatings should be dismissed. An appropriate ceramic tile cleaning solution aligns with the deposit and finish, enabling dissolved soil to exit the floor rather than drying back into the joints.
After addressing heavy contamination, routine maintenance should revert to pH-neutral cleaning. Avoid using bleach, strongly acidic supermarket products, washing-up liquid, and abrasive scrubbing tools, as these can strip grout colour, leave detergent residue, or scratch the tile surface. Removing loose grit before wet mopping also prolongs the life of the installation.
Proper maintenance makes a restored floor much easier to care for, and a professionally cleaned and adequately protected installation can look significantly improved post-intervention. Broader advice on ongoing care and related ceramic decisions can be found in the ceramic and porcelain flooring care hub, while buyers contemplating residue or coatings may wish to explore whether wax or sealant is appropriate for their ceramic tiles prior to moving forward.

David Allen — Abbey Floor Care
David Allen brings over 30 years of experience at Abbey Floor Care to ceramic tile cleaning decisions throughout the UK. His buyer-focused guidance centres on aligning cleaner chemistry with soil type, tile finish, grout condition, and the realistic limits of what cleaning can safely achieve.
The article Heavy Duty Ceramic Tile Cleaner For Dirt That Looks Alike first appeared on https://abbeyfloorcare.co.uk